Phase 1: Layout

Driveway / Access
Access to the pool site during and after construction is very important. During construction, a variety of heavy equipment from a large backhoe and ten-wheel dump trucks to the gunite rig, bulldozers and small masonry laden dump trucks must have free and mobile access.
Site Work
Before any work can be performed, the site must be cleared and benched (leveled off or shored up) On occasion, this area might contain natural impediments which need to be addressed in order to proceed with the project.
Phase 2: Framing & Excavation

Forming:
Prior to the actual excavation of the pool, form boards are laid out according to the design plans. This is the first point the shape of the pool can be seen in actual size. This is also the last opportunity to make major structural design changes should those be desired.
Machinery:
Will be brought in to perform the removal or relocation of earth, rocks and possibly underground ledge. Should the excavation team encounter ledge rock during this process, blasting may become a necessity to continue. The only feasible alternative to blasting is relocation of the pool.
Drainage:
Upon completion of the excavation process, current site conditions are addressed. If there appears to be a water table condition, or inadequate drainage then appropriate design solutions are implemented. The most common situation, water in the shell area, requires additional under-pool stone to be added with possibly a drainage pipe to grade. Some conditions require even more involved design solutions.
Phase 3: Steel Reinforcement
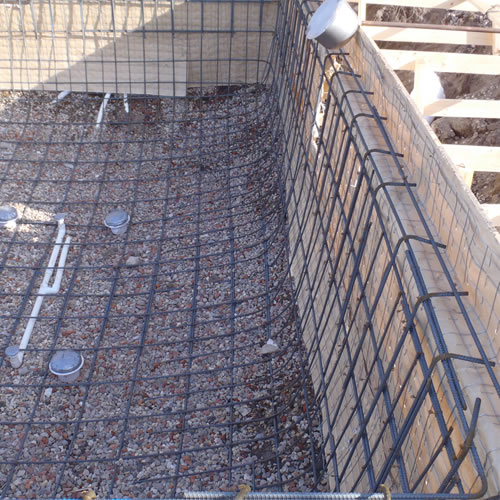
Steel Reinforcing:
The first actual structural piece of the swimming pool is the steel reinforcing cage. Our ironworkers will bend and tie the steel rebar to form a gridlike pattern which is used to strengthen the pool's gunite shell.
Interior Plumbing:
It is at this point that all internal plumbing fittings are installed. Each fitting designed to penetrate from the shell exterior to the pool's interior, is carefully located according to the plans and attached to the steel reinforcing. Should additional reinforcing be necessary to support external fittings, such as skimmers, it will be added to the supporting grid after the fitting is in place.
Gunite Preparation:
The next step for the shell to be completely ready to accommodate the gunite application process is to set-up final guide wires or rods and to tie all wall retaining material to the shell. Improper preparation can create difficult conditions which need to be corrected during the gunite application.
Phase 4: Gunite Application

Gunite:
This is one of the more unique and difficult processes of the swimming pool construction. After inspection of the steel shell and electrical connections (for lights...) the pool is ready for gunite. The actual process consists of a gunite rig from a cement truck, down a long hose to a nozzle. The nozzle is attached to an air compressor which actually causes the material to spray out of the nozzle in a controlled direction and flow rate.
This process requires a highly-specialized crew and should not be allocated to the cheapest bidding subcontractor, to achieve a proper result. The cement mix being delivered by the cement trucks must conform to rigid saturation and design mix requirements to allow for optimal placement by the gunite nozzleman. Our gunite rig operator must be able to tell when a delivered mix is not up to specifications and must insure the mix is corrected before it is applied to the pool. Our nozzleman must be able to recognize when a mix is under saturated or over saturated to prevent slump or sag in the material. It is the experience of these two individuals which determines the quality of the gunite application. The remainder of the crew serve as shapers or carvers of the material as it is applied to the steel cage. It is their expertise that determines the flatness or uniform slope of the finished gunite shell, stairs and/or benches.
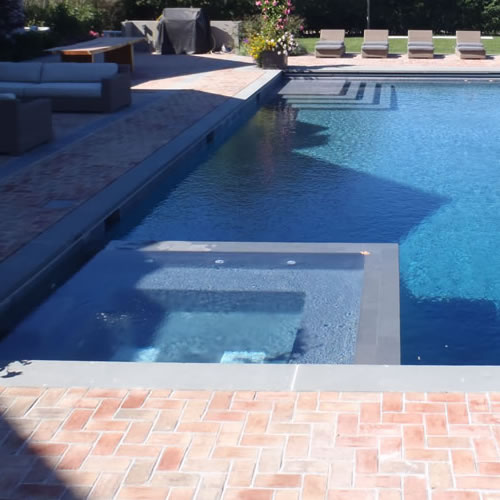
Phase 5: Tile & Coping

With the gunite process complete and the cement having cured, the final steps can begin. The pool has taken on shape and form and has become more than just a hole in the ground.
The first process after gunite is to remove all forming materials. Removal of these materials is necessary to access the pool shell exterior and correct any areas which may need parging or waterproofing.
Tile:
A band of tile is an option that can be installed at the pool's water line. Thin ceramic or slate tile provides a durable and readily maintainable surface at the water line. The standard tile is a 6" x 6" square made of slate or frost free ceramics. Choosing a color must involve consideration of the interior finish, coping and decking materials.
Coping:
Coping is the term used to identify the stone or concrete material used around the pool shell wall. This is almost always done in conjunction with the final pool patios, by the same mason contractor, assuring matching material, grout and workmanship.
A common form of material used for this function is Bluestone Treads, or brick, but many other options are available including pre-cast cement material. Natural stone coping offers the warmth, texture and sturdiness of stone. Materials ranging from quarried granite, limestone and bluestone to natural fieldstone offer beautiful and long lasting coping solutions. In working with natural stone, it is very important to specify consistent coping thickness for this most visible pool element.
Phase 6: Interior Finish

The interior finish of a pool can range from waterproof paint to fiberglass/acrylic linings to tile or marble dust. Due to cost and maintenance considerations, Imperial recommends Marble Dusting, a marble aggregate plaster-like finish troweled on the pool interior. Marble dust can be tinted a variety of colors from black to white. The surface is affected by a variety of cosmetic imperfections such as trowel marks, small shrinkage cracks and mottling are considered normal for this application. "Marble Dust" is a long lasting and beautiful natural finish in a properly maintained pool. Paint is a uniform finish available in a wide variety of pigments. However, it is maintenance intensive, requiring frequent pump-downs, sandblasting and re-painting. Tiled interiors, although very expensive, offer the chance of beautiful mosaics or designs inside the pool. A product known as pebbletech or pebblecrete involves a small stone aggregate, much like exposed aggregate covering the interior of a pool.
Phase 7: Exterior Finish
Decks:
Deck areas surrounding a pool can run the gamut from poured in place, broom finish concrete to wood decks to brick pavers or natural stone masonry. Different materials possess different assets and limitations. Bluestone, commonly referred to as flagstone offers a sleek and traditional look. However, very sunny sites will often heat up bluestone to uncomfortable levels, particularly for young children. Brick too can be a hot, sometimes slippery surface. Many different colors and patterns are available with brick decks. We have often found the combination of brick pavers and bluestone coping and border bands to be quite attractive. In all cases, soft so called "antique" brick is to be avoided as this material is known to absorb water and spall or crack during the frozen winter months.
Wood decks of high grade or mahogany offer a sleek, soft and nautical look. Care should be taken to choose high grade, non-splintering wood to avoid the danger of splinters. Granite decks offer the rustic look of stone and great durability.
All masonry decks can either be installed atop flexible granular bases or on concrete. We have found flexible bases, stone blend or drypack, to be the most cost effective and durable solutions in the Northeast's climate. The extent of deck installed can vary depending upon the size of the pool's intended use and whether is of a natural or traditional design.
There should always be a deck area at the pool's northeast corner to take advantage of afternoon sunlight reflecting off the pool's surface.
We are increasingly seeing smaller decks or stepping stones with primarily lawn or plant beds surrounding the pool. However, large crowds or frequent and intensive use require durable wooden or masonry decks. Your landscaper can provide a range of costs for each type of decking being considered.